Double Pocket Card
Supplies
Score board and tool
12"x12" card stock will make a 6" card
Scissor
Double sided tape
Backing paper,embellishment of your choice.
1. I have stared with a 12"x 12" light card stock mine is green on both sides up you can use double sided pattern paper as well.
Score your paper at 6"sideways and longways.
2 Cut your card to the center.
3 Fold the bottom right hand corner to the center.
4 Now fold the top left hand corner towards the center but don't go all the way leave about a 1/2 ",this will form the back pocket.
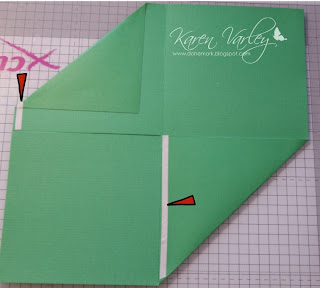
5 Add your double sided tape where shown on the picture.
Then sick them down your card should now look like picture 6.
6 Now add more tape where marked in the picture above.
7 Now fold and stick down the top left hand side as shown above.
This will give you your 1st pocket.
8 Fold the bottom right hand corner over the pocket to have just made and stick down,you should now have you double pocket card .
Crafty Hugs
Kaz.
XxX
Pop up Christmas card
Supplies
12x12 card stock mine is from The Christmas glitter stack from DCWV
Spellbinders dies
Clear stamps from Papermainia
Promakers
Ribbon
Glitter, Gems & Card candy
Cut your 12x12 card down to 6x12,
then score at 1.5",3",4.5",7.5",9",and 10.5"
When folded it should look like this.
With the other piece of 12x6 card stock cut a rectangle 5x7"
I used a large spellbinders die but can bee done by hand.
Then tape you 5x7" rectangle and stick it to the bottom of the12x6".
Now add the ribbon this goes between the 1st & 2nd fold.
Then stick the 2 ends together.
It should now stand up like this,
you can now add your image and embellishments, your card will fold flat for posting.
Add a image and embellishment.
____________________________
Gift Pocket Card
Supplies:
6" x 10" cardstock
4" x 7" cardstock
3 patterned papers 4" x 6"
1 patterned paper 2" x 7"
24" ribbon cut in half.
Score and fold at 4.5" and 5.5"
Score at .5" 1.5" 5.5" and 6.5"
Turn the 4" x 7" vertical and score at 1" and 2."
Cut out the 4 crosses
Fold so it look like this
Cut the pattered paper
Stick the ribbon under the front on the left hand side.
stick the other ribbon on the right hand side on the inside,
add the pattered paper and the pocket on the right hand side.
Decorated the inside and out as you like
Hope this all make scene to you if you need any help just drop me a line.
Happy Crafting


love the tutorial and have the same stamp and not used yet.I will have a go when I get the time...never have enough!... I will let you know how I get on thanks for posting the tutorial it looks good and seems straight forwards...I think!!!..it will be a great card for my nieces birthday
ReplyDeleteThanks for this nice tutorial.
ReplyDeletebye
Noemi